Using Cloudflare Tunnel with Traefik
This tutorial will walk you through how to use Cloudflare Tunnel with Traefik and Google OAuth. You may find individual tutorials elsehwere for how to use each of these applications for your Docker home lab set up. But here we will focus specifically on how to have these services play together nicely with each other. I used the Traefik and Google OAuth tutorials at smarthomebeginner.com to set up Traefik and Google OAuth. I recommend that you follow their super helpful Traefik tutorial and Google OAuth tutorial for the full setup. I will focus here on the changes that you would need for using Cloudflare Tunnel.
To keep this guide self contained, let’s start with a simple example of a Traefik setup from the official guide. The steps here can then be adapted to your actual setup.
Part 1: Basic Traefik setup with Cloudflare Tunnel
1
2
3
4
5
6
7
8
9
10
11
12
13
14
15
16
17
18
19
20
21
22
23
24

services:
  reverse-proxy:
    # The official v3 Traefik docker image
    image: traefik:v3.2
    # Enables the web UI and tells Traefik to listen to docker
    command:
      - --api.insecure=true
      - --providers.docker
      - --providers.docker.exposedbydefault=false
    ports:
      # The HTTP port
      - "80:80"
      # The Web UI (enabled by --api.insecure=true)
      - "8080:8080"
    volumes:
      # So that Traefik can listen to the Docker events
      - /var/run/docker.sock:/var/run/docker.sock

  whoami:
    # A container that exposes an API to show its IP address
    image: traefik/whoami
    labels:
      - "traefik.enable=true"
      - "traefik.http.routers.whoami.rule=Host(`whoami.$TODO_YOUR_DOMAIN`)"
I have used the TODO prefix for environment variables which you would need to populate. You can create a .env file in the same directory as your docker compose file to specify the environment variables.
You can test the set up by running
1

curl -H Host:whoami.$TODO_YOUR_DOMAIN http://127.0.0.1
The output should show your IP address and other metadata.
Setting up the Cloudflare tunnel
Follow Cloudflare’s guide to set up a Cloudflare tunnel using the dashboard.
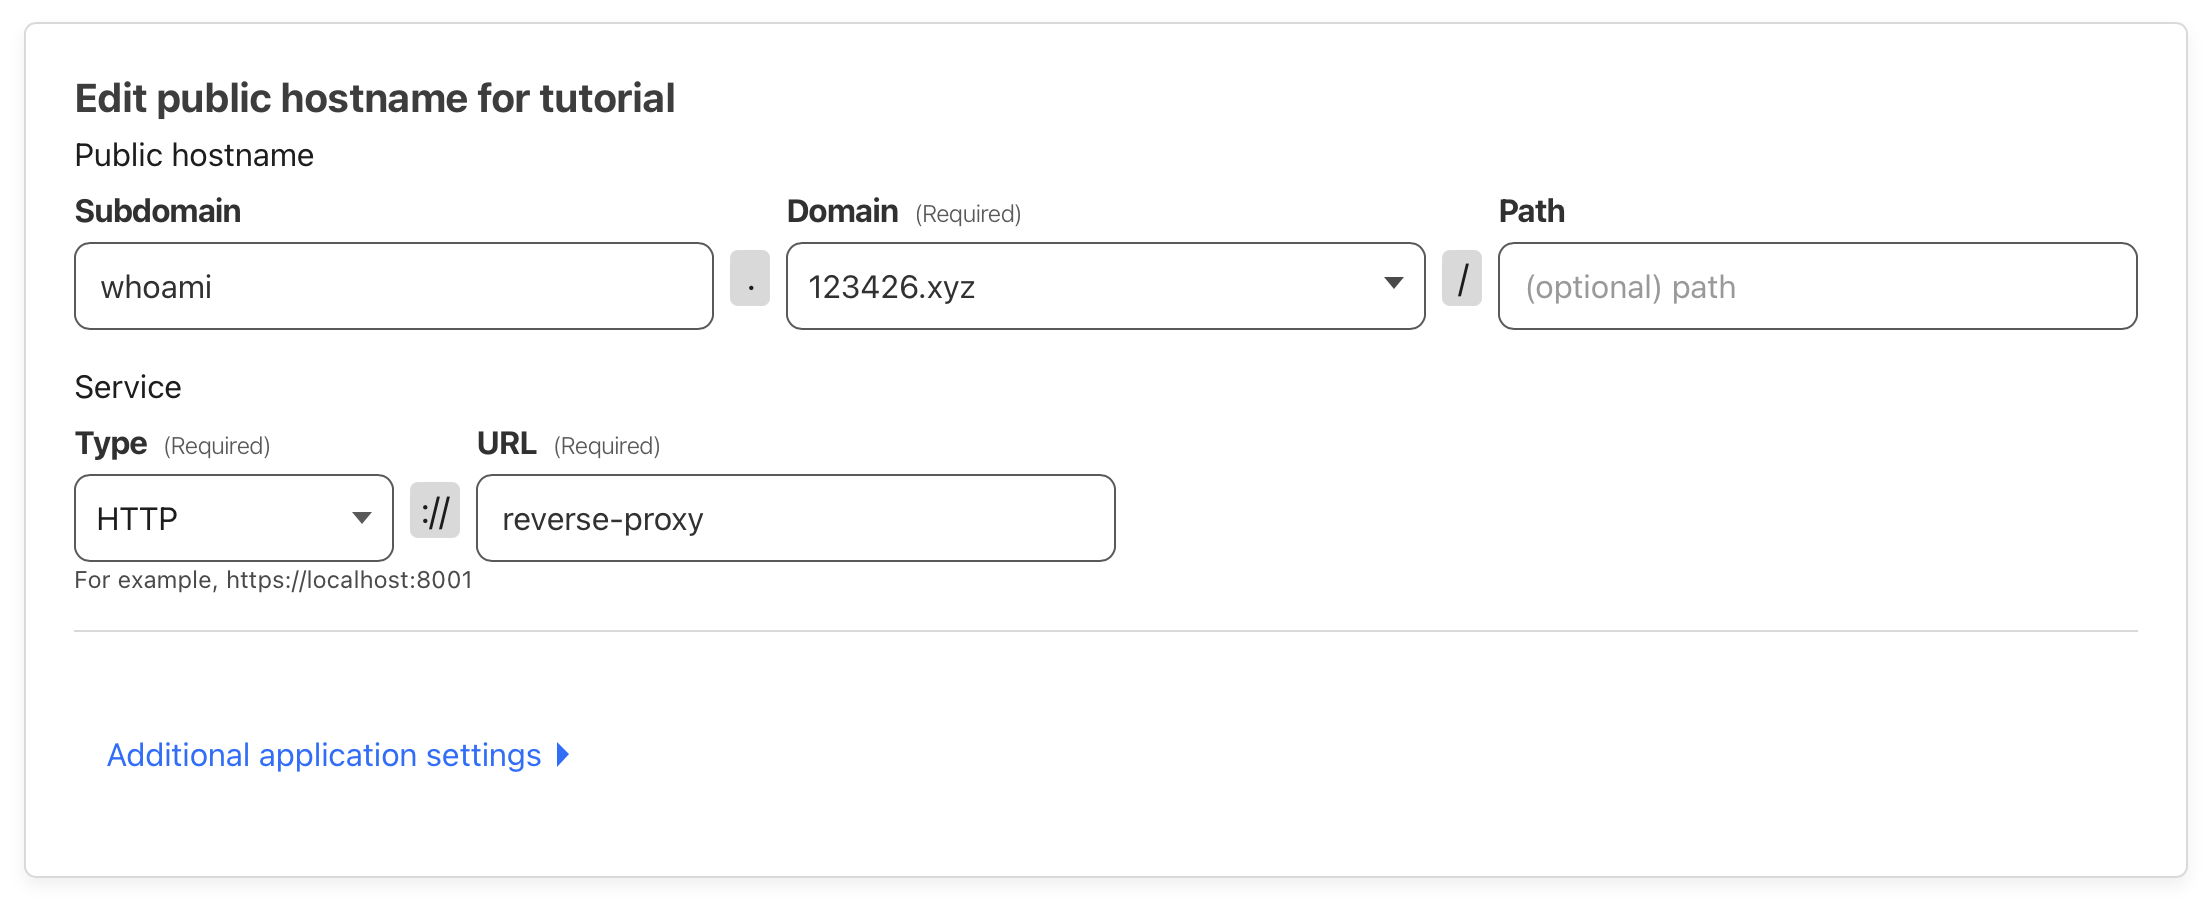 Adding a public hostname that maps to the new Cloudflare tunnel. Notice that in the URL field we put
 reverse-proxy, which is the container name of the Traefik container we defined. This works because docker containers within the same network can reach each other using the container names.
1
2
3
4
5
6
7
8
9

  cloudflared:
    image: cloudflare/cloudflared
    container_name: cloudflared
    security_opt:
      - no-new-privileges:true
    command: tunnel --no-autoupdate run
    environment:
      - TUNNEL_TOKEN=$TODO_CLOUDFLARE_TOKEN
    restart: unless-stopped
You can test the setup using
1

curl -L whoami.$TODO_YOUR_DOMAIN
The -L flag allows curl to follow the redirects used by Cloudflare tunnels. You should also be able to use a device outside your local network to visit your website.
Part 2: Using wildcard for subdomains
To minimize configuration overhead, you may wish to avoid having to update the Cloudflare Tunnel configuration every time you want to expose a new Docker container via the tunnel. We can achieve this by using a wildcard DNS entry.
Start by adding another public hostname for your tunnel.
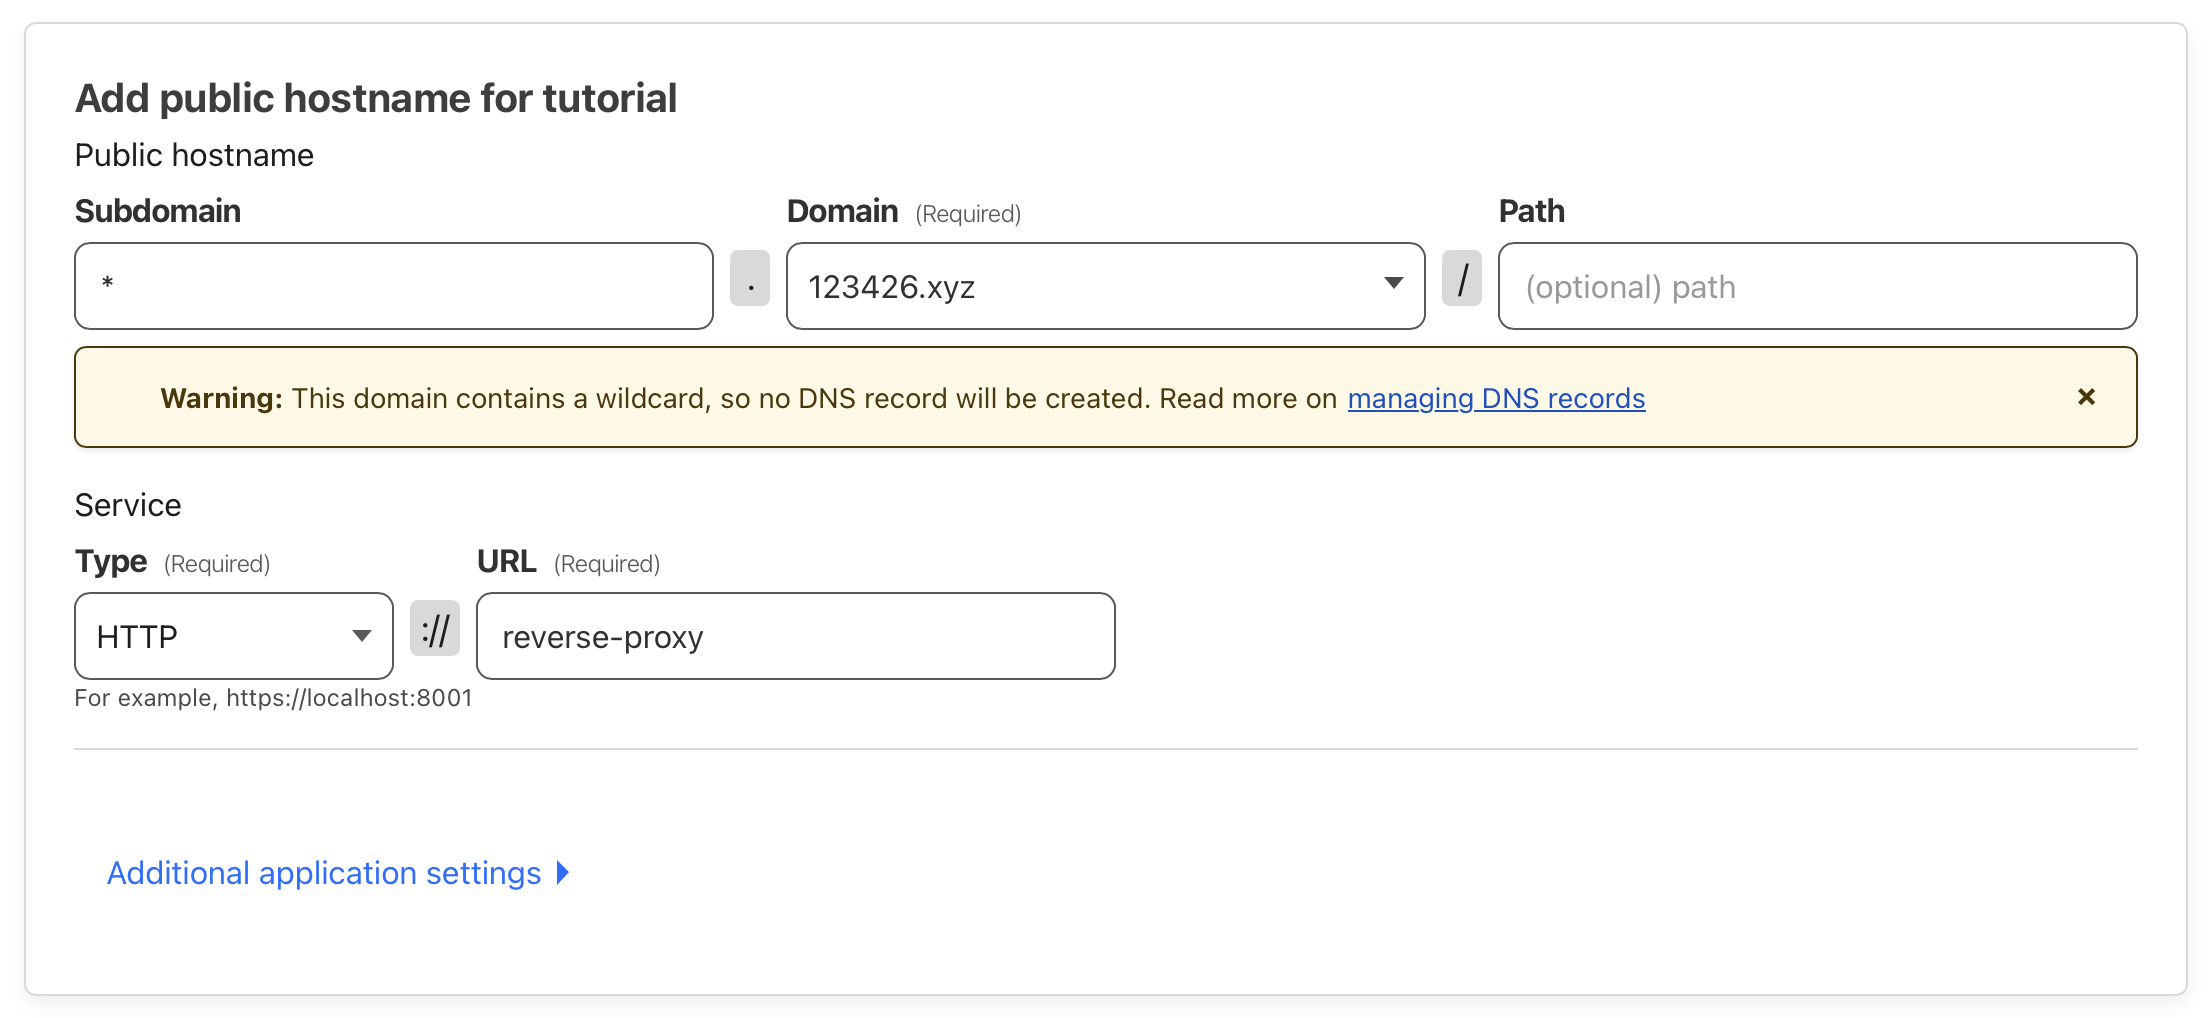 Adding a wildcard public hostname for the Cloudflare tunnel
Notice the warning about DNS records. We need to manually create a wildcard DNS record. This is where our existing CNAME DNS record for whoami will come in handy. We can copy the Target field from the existing record and use it for the new DNS record. This works because we would like the new record to point to the same tunnel. The Target should be of the form TODO_YOUR_TUNNEL_ID.cfargotunnel.com.
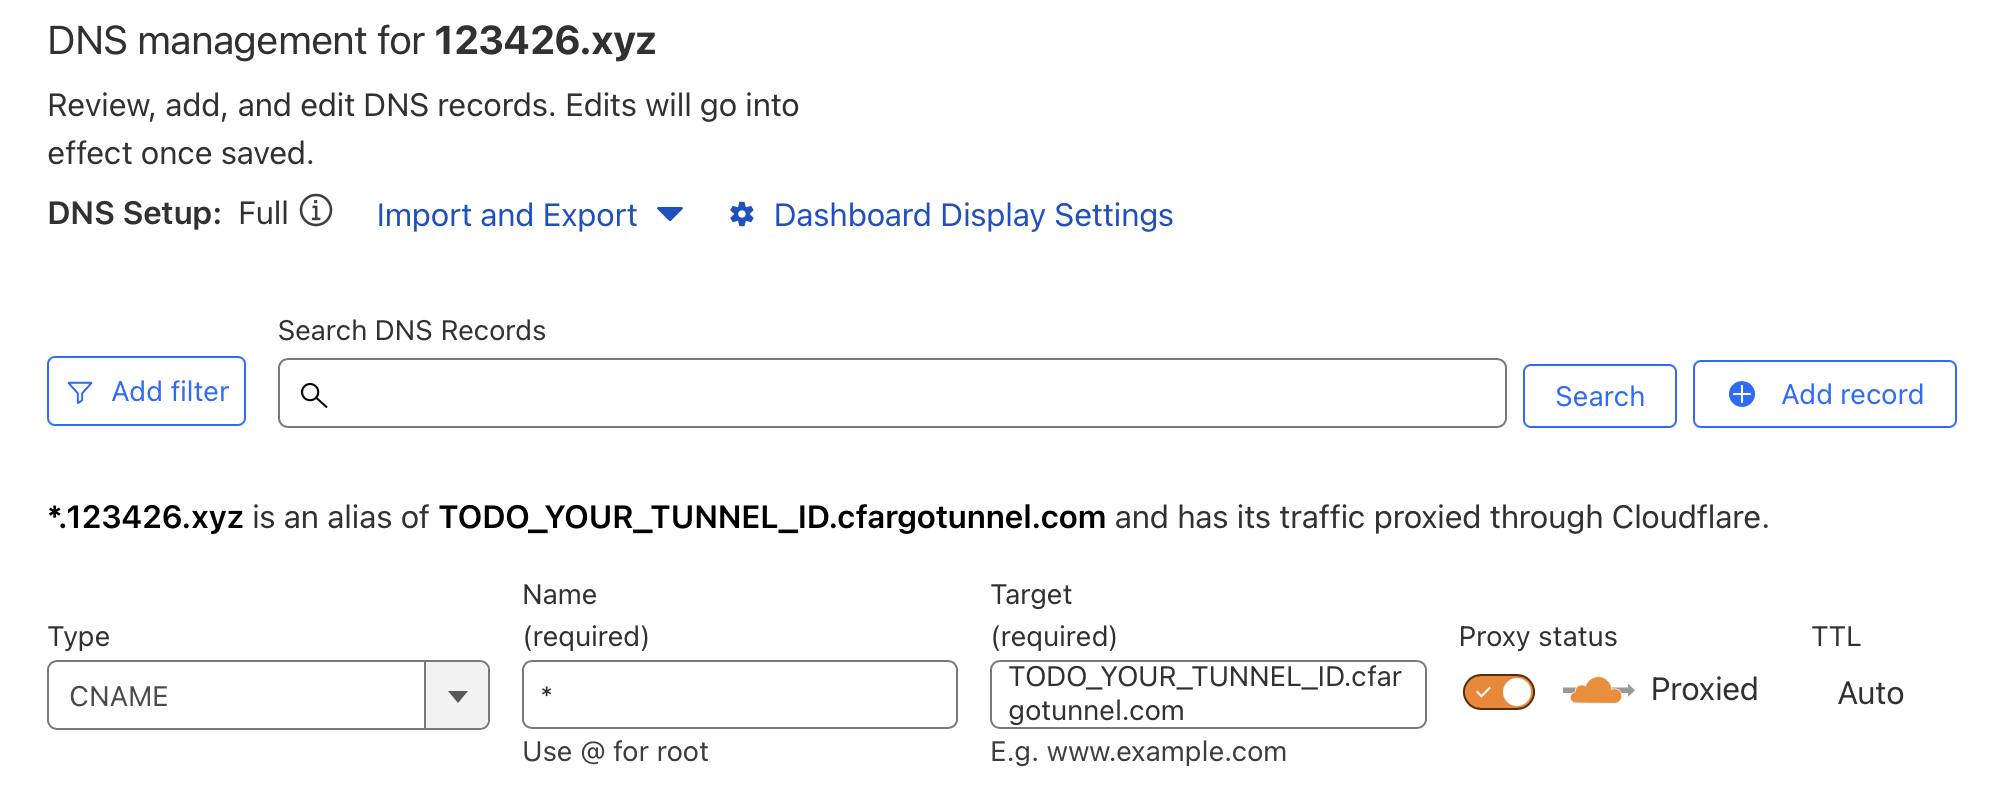 Adding a wildcard DNS entry with the same
 Target as the existing whoami entry.
You can now go ahead and remove the whoami hostname entry from the tunnel configuration page. This will also remove the DNS entry automatically.
You can confirm that the tunnel still works with the new wildcard entry by running
1

curl -L whoami.$TODO_YOUR_DOMAIN
Adding a new container behind the proxy will now only require modifying the Treafik configuration.
Part 3: Obtain Google OAuth Credentials
Before we start adding Google OAuth to our Docker setup, we need to set up the OAuth project and obtain the required credentials using the Google Cloud Developer Console. This is explained very well in Step 2 and Step 3 of the Google OAuth guide at smarthomebeginner.com, so I will skip describing the process here.
By the end of this step, you should have your OAuth client set up to redirect to https://oauth.$TODO_YOUR_DOMAIN/_oauth, and have a client ID and client secret generated for you.
Part 4: Adding Google OAuth to Traefik
Let’s start by adding the thomseddon/traefik-forward-auth service to our Docker compose.
1
2
3
4
5
6
7
8
9
10
11
12
13
14
15
16
17
18
19
20
21
22
23
24
25

  oauth:
    container_name: oauth
    image: thomseddon/traefik-forward-auth:2.2-arm
    security_opt:
      - no-new-privileges:true
    restart: unless-stopped
    environment:
      - CONFIG=/config
      - COOKIE_DOMAIN=$TODO_YOUR_DOMAIN
      - INSECURE_COOKIE=false
      - AUTH_HOST=oauth.$TODO_YOUR_DOMAIN
      - URL_PATH=/_oauth
    secrets:
      - source: oauth_secrets
        target: /config
    labels:
      - "traefik.enable=true"
      # HTTP Routers
      - "traefik.http.routers.oauth-rtr.entrypoints=websecure"
      - "traefik.http.routers.oauth-rtr.rule=Host(`oauth.$TODO_YOUR_DOMAIN`)"
      # Middlewares
      - "traefik.http.routers.oauth-rtr.middlewares=chain-oauth@file"
      # HTTP Services
      - "traefik.http.routers.oauth-rtr.service=oauth-svc"
      - "traefik.http.services.oauth-svc.loadbalancer.server.port=4181"
We also need to make some changes to the configuration of our existing containers.
For reverse-proxy we need to define a new entrypoint for HTTPS(port 443) connections and specify tls for the entrypoint. We can also remove the port forwarding for the HTTP port because we would only be accessing our server through the Cloudflare tunnel and containers within the same network can reach each other’s ports. We also need to map the traefik/rules directory which has our middlewares defined.
1
2
3
4
5
6
7
8
9
10
11
12
13
14
15
16
17
18

  reverse-proxy:
    # The official v3 Traefik docker image
    image: traefik:v3.2
    # Enables the web UI and tells Traefik to listen to docker
    command:
      - --api.insecure=true
      - --providers.docker
      - --providers.docker.exposedbydefault=false
      - --providers.file.directory=/rules
      - --entryPoints.websecure.address=:443
      - --entrypoints.websecure.http.tls=true
    ports:
      # The Web UI (enabled by --api.insecure=true)
      - "8080:8080"
    volumes:
      # So that Traefik can listen to the Docker events
      - /var/run/docker.sock:/var/run/docker.sock
      - $TODO_DOCKER_DIR/traefik/rules:/rules # Dynamic File Provider directory
For whoami, we need to specify the chain-oauth middleware.
1
2
3
4
5
6
7

  whoami:
    # A container that exposes an API to show its IP address
    image: traefik/whoami
    labels:
      - "traefik.enable=true"
      - "traefik.http.routers.whoami.rule=Host(`whoami.$TODO_YOUR_DOMAIN`)"
      - "traefik.http.routers.whoami.middlewares=chain-oauth@file"
If we try going to http://whoami.$TODO_YOUR_DOMAIN on a browser, we will get a Bad gateway error. If you started your containers using docker compose up you should be able to see an error message in the logs.
1

cloudflared      | 2024-11-26T05:52:22Z ERR  error="Unable to reach the origin service. The service may be down or it may not be responding to traffic from cloudflared: dial tcp 172.19.0.2:80: connect: connection refused" connIndex=1 event=1 ingressRule=0 originService=http://reverse-proxy
The error makes sense because we now have Treafik listening on the HTTPS port. Let’s fix this by first changing the service type to HTTPS in the Clouldflare tunnel configuration page.
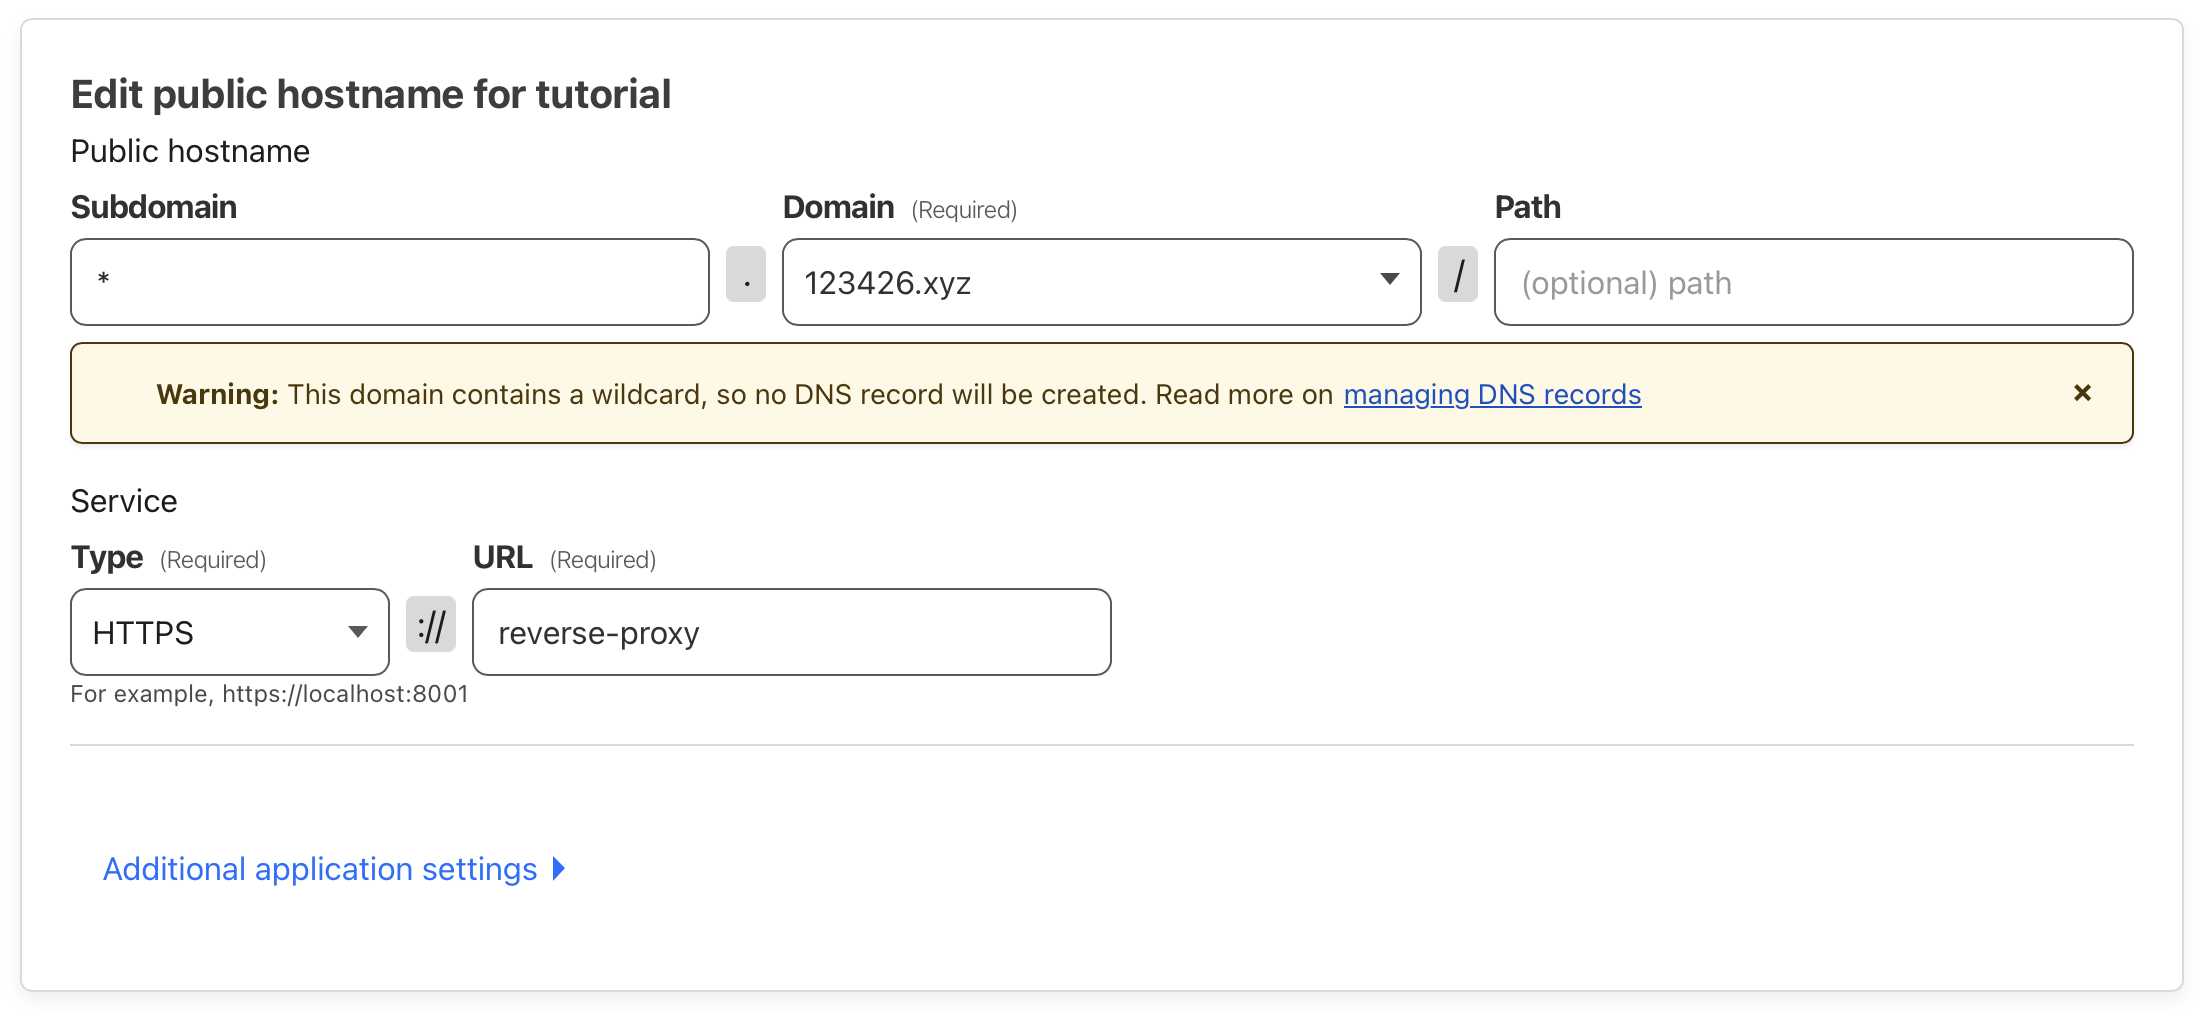 Changing the service type to HTTPS for the tunnel
If we try again, we still get the Bad gateway error, but this time a different error message on the terminal.
1

cloudflared      | 2024-11-26T03:05:37Z ERR  error="Unable to reach the origin service. The service may be down or it may not be responding to traffic from cloudflared: tls: failed to verify certificate: x509: certificate is valid for 796d8bfd92656ca7ac5f647d1235e5ec.eb6ac2b89b32eb341bfdbbcc2559f63d.traefik.default, not reverse-proxy" connIndex=1 event=1 ingressRule=0 originService=https://reverse-proxy
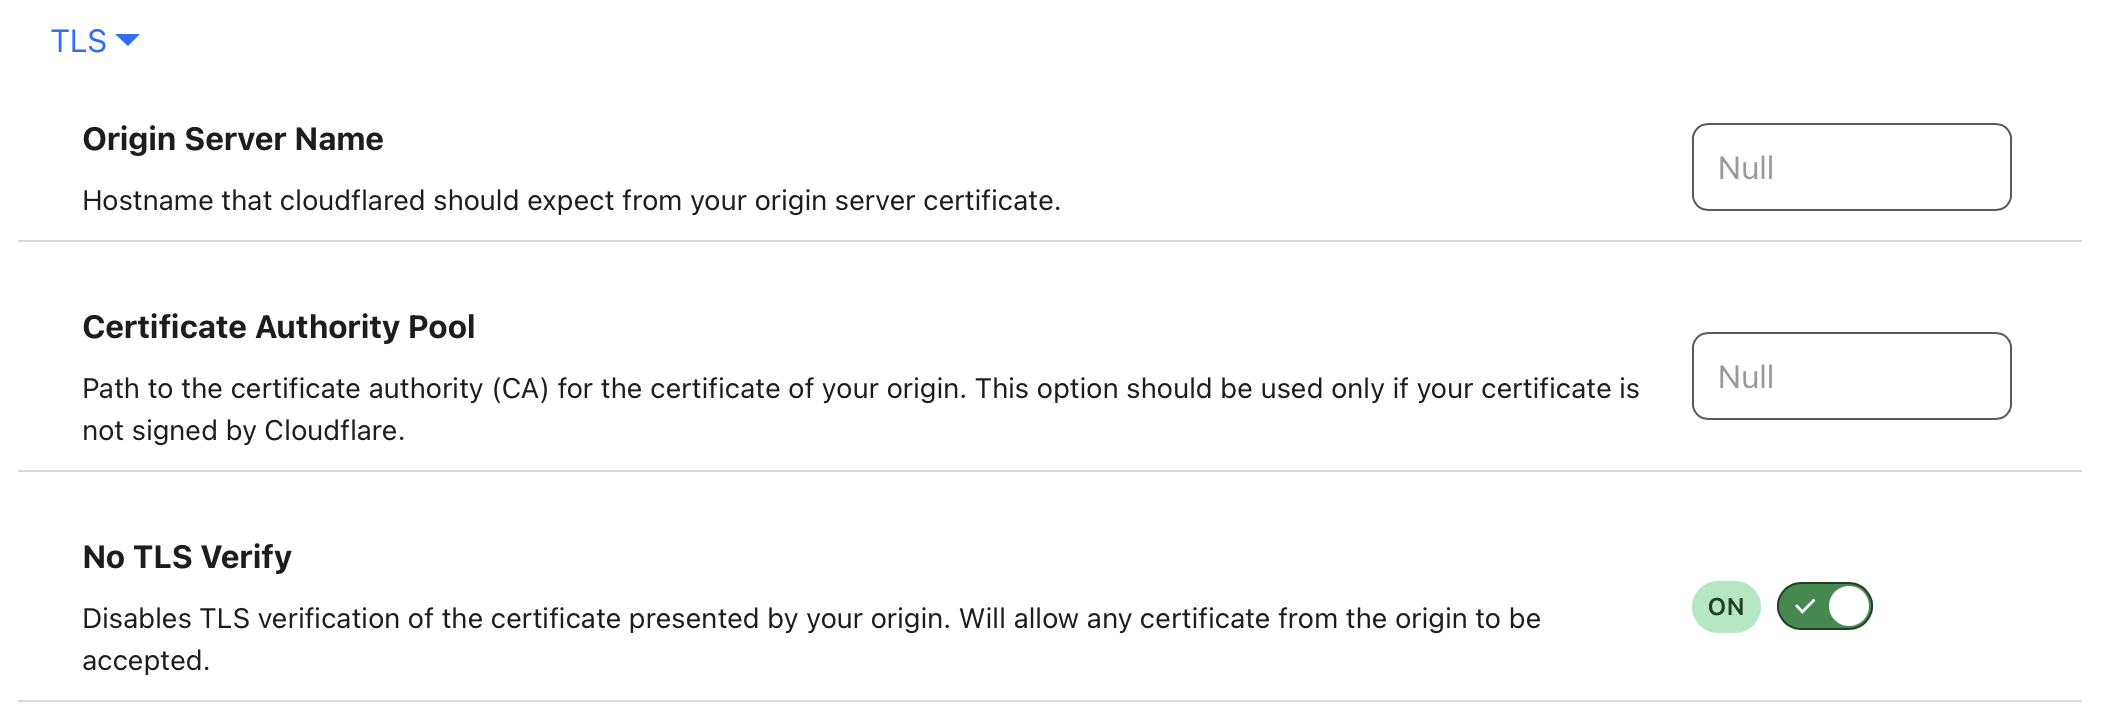
This time the issue is that Traefik is using its default SSL certificate since we did not set up our own SSL certificate. We can get around this issue by turning on No TLS verify in the Clouldflare tunnel configuration page.
 Turning on
 No TLS Verify for the tunnel
With this setting enabled, Cloudflare will no longer verify the validity of the certificate provided by Traefik. The connection between Cloudflare and your server is via the Cloudflare tunnel and is still encrypted. In the next part, we will cover how to set your SSL certificate so that you don’t have to disable TLS verification.
Part 5: Obtaining your Let’s Encrypt SSL certificate
Using a Let’s Encrypt SSL certificate for our Treafik setup will allow Cloudflare to verify the certificate provided by Traefik when Cloudlfare reaches out to our server.
Using TLS verify
First, let’s turn off No TLS Verify from the Cloudflare tunnel configuration page to be able to test our changes as we go along.
 Turning off
 No TLS Verify for the tunnel
Updating Traefik configuration to generate the certificate
Create a directory named acme under the traefik directory you previously created. This directory will host the certificate fetched from Let’s Encrypt.
Follow the instructions at smarthomebeginner.com to create a DNS API token and specify it as a Docker secret. You should end up with a cf_dns_api_token file inside your secrets folder. Note that these instructions are meant for domains that use Cloudflare as their nameserver. Traefik supports multiple other DNS providers. You can find the documentation on their website.
We can now update the docker compose file for our reverse-proxy container.
1
2
3
4
5
6
7
8
9
10
11
12
13
14
15
16
17
18
19
20
21
22
23
24
25
26
27
28
29
30
31

  reverse-proxy:
    # The official v3 Traefik docker image
    image: traefik:v3.2
    # Enables the web UI and tells Traefik to listen to docker
    command:
      - --api.insecure=true
      - --providers.docker
      - --providers.docker.exposedbydefault=false
      - --providers.file.directory=/rules
      - --entryPoints.websecure.address=:443
      - --entrypoints.websecure.http.tls=true
      - --entrypoints.websecure.http.tls.certresolver=dns-cloudflare
      - --entrypoints.websecure.http.tls.domains[0].main=$TODO_YOUR_DOMAIN
      - --entrypoints.websecure.http.tls.domains[0].sans=*.$TODO_YOUR_DOMAIN
      - --certificatesResolvers.dns-cloudflare.acme.caServer=https://acme-staging-v02.api.letsencrypt.org/directory # LetsEncrypt Staging Server - uncomment when testing
      - --certificatesResolvers.dns-cloudflare.acme.storage=/acme/acme.json
      - --certificatesResolvers.dns-cloudflare.acme.dnsChallenge.provider=cloudflare
      - --certificatesResolvers.dns-cloudflare.acme.dnsChallenge.resolvers=1.1.1.1:53,1.0.0.1:53
      - --certificatesResolvers.dns-cloudflare.acme.dnsChallenge.delayBeforeCheck=90 # To delay DNS check and reduce LE hitrate
    ports:
      # The Web UI (enabled by --api.insecure=true)
      - "8080:8080"
    volumes:
      # So that Traefik can listen to the Docker events
      - /var/run/docker.sock:/var/run/docker.sock
      - $TODO_DOCKER_DIR/traefik/rules:/rules # Dynamic File Provider directory
      - $TODO_DOCKER_DIR/traefik/acme:/acme # Certs File
    environment:
      - CF_DNS_API_TOKEN_FILE=/run/secrets/cf_dns_api_token
    secrets:
      - cf_dns_api_token
Setting Origin Server Name
After updating the configuration, start the containers again using docker compose up. Wait for about 2 minutes for the certificate to be generated. You should see an acme.json file inside the acme folder if everything goes well. Now, when we try going to http://whoami.$TODO_YOUR_DOMAIN on a browser, we will get a Bad gateway error. You should be able to see an error message in the docker logs
1

cloudflared      | 2024-12-24T20:40:55Z ERR  error="Unable to reach the origin service. The service may be down or it may not be responding to traffic from cloudflared: tls: failed to verify certificate: x509: certificate is valid for f7d858dbef2110696cfba8b30a775af4.cbec424d71d1c5316d7088e49b9f8980.traefik.default, not reverse-proxy" connIndex=0 event=1 ingressRule=0 originService=https://reverse-proxy
This error occurs because Treafik returns the default certificate locally generated by Treafik if a request does not correspond to the any of the configured routes. To fix this, we need to specify the Origin Server Name as *.$TODO_YOUR_DOMAIN on the configuration page of our Cloudflare tunnel.
 Setting the
 Origin Server Name for the tunnel
Fetching the actual Let’s Encrypt certificate
Attempting to open http://whoami.$TODO_YOUR_DOMAIN now will result in a different error on the terminal.
1

cloudflared      | 2024-12-24T22:08:51Z ERR  error="Unable to reach the origin service. The service may be down or it may not be responding to traffic from cloudflared: tls: failed to verify certificate: x509: certificate signed by unknown authority" connIndex=2 event=1 ingressRule=0 originService=https://reverse-proxy
This is because we are currently using the staging certificate from Let’s Encrypt. Delete the generated acme.json file and comment out the following line from your docker configuration.
1

# - --certificatesResolvers.dns-cloudflare.acme.caServer=https://acme-staging-v02.api.letsencrypt.org/directory
Start your containers again and wait for 2 minutes. Traefik should have now fetched the real certificates for your domain. You should now be able to open http://whoami.$TODO_YOUR_DOMAIN and autheniticate using Google OAuth successfully.